
Quilt blocks always have their own names but I don't know if this quilt block is a new one or already has a name. Until someone tells me what this block is officially called, I will call it LynneBobSquarePants. Using the directions here, you will make a 12" finished block.
Wanna play along and have a go at making this block just for fun? Good practice for accurate cutting, accurate seams, matching points and playing with scraps. I have made it from Kona charcoal and some fabulous Liberty "scraps" I won in a giveaway from my comedy friends, Yvonne and Reene at Nellies Niceties. If you are using your Liberty scraps, a healthy dose of starch spray on them before starting prevents them from slipping and stretching as they are wont to do (oooh I sound like Shakespeare).
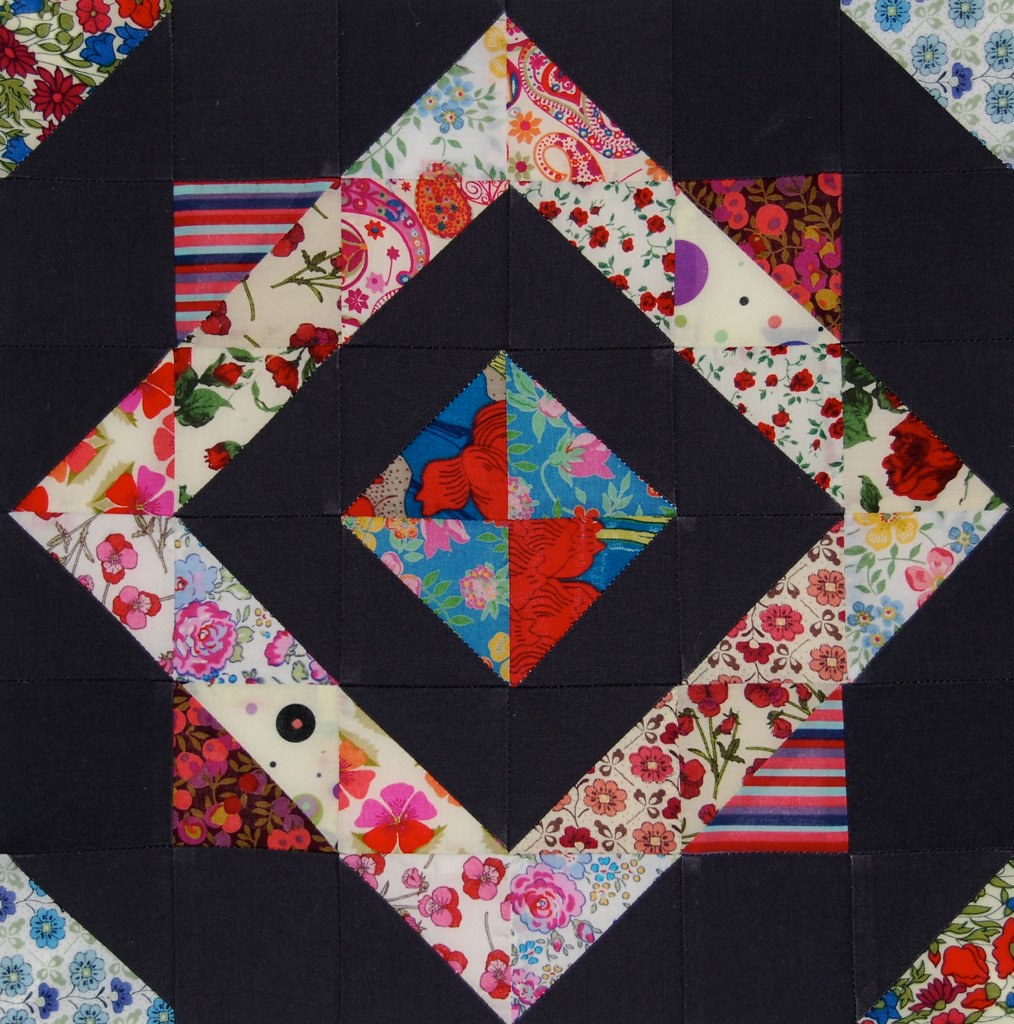
You will need:
Sixteen 3" squares of coloured fabrics
Twelve 3" squares and eight 2 1/2" squares of neutral fabric
1. Pair up the twelve 3" neutral squares with twelve of the 3" coloured squares. Pair up the remaining four coloured squares into two pairs. For the coloured pairs, I matched darker with lighter fabrics to make the main square pop.
2. Mark a line along the diagonal on one of the fabrics. I used a pencil

3. Sew two seam lines 1/4" either side of this line.

4. Cut along the line.


6. Trim your blocks to 2 1/2" square ensuring that you align the diagonal on your ruler or cutting mat with the diagonal seams. This is the bit to take time and care over. Make sure you cut so that the diagonal seam sits rights on the diagonal line of the block.

7. Lay out all your HST squares and neutral squares to make the pattern in the finished block.
8. Sew into rows pressing to the left in one row, to the right in the next, to the left in the next and to the right in the next so that, when you join the rows, the seams can butt up against each other.
9. Sew the rows together and press these seams open and VOILA you have your very own [insert your own name here] BobSquarepants.
A lovely use of these Liberty prints Lynne! I did have a little chuckle when I read instruction no 5. I have clearly lived with a Star Wars fan for too long ;-)
ReplyDeleteSince the first sketch this has been a hilarious little block coming to fruition. When you have your book of blocks I hope it remains Lynnebobsquarepants!
ReplyDeleteI always did think you sound a lot like Shakespeare ;-)
ReplyDeleteGreat block and tute Lynne, and whatever this block is called to me it will always be LynneBobSquarepants!
xx
Lynne how good are you?? You're working with some real momentum at the mo - and shakespeare in the mix too!! I too chuckled at No5 - geek!
ReplyDeleteOooh lovin' Lynnebobsquarepants! It looks fabulous
ReplyDelete'ooh I sound like Shakespeare' has got to be the funniest thing I've heard today!! Thank you!
ReplyDeleteGreat looking block. Thanks. Had to snicker a bit at that name though. lol
ReplyDeleteI am going to try this with some 2.5" squares, if that pleaseth you, as that's what I've got to hand, and am wont to do, forsooth, sirrah ...
ReplyDeletemany thanks for a lovely block, thou ist bestest evah!
.. exeunt, pursued by a bear ...
lynne, you're cracking me up...let's go jellyfishing!...eh, quilting :)
ReplyDeleteVery pretty block, Lynne! And I love the name....
ReplyDeleteWell Lynne I too had to have a chuckle at no 5 'to the dark side' not so much Shakespeare as Star Wars! :) Anyway, it's a lovely block and a great way to use Liberty prints, they really pop out don't they? I'm thinking of making a Cathedral Window Cushion with some of my Liberty fabrics with some white Nottingham lace. I'm wondering if the colours will stand out as much as they do here? Keep up the amazing work! Oh, and may the force be with you!!!! :)
ReplyDeleteI love this block Lynne, and a great tutorial where you managed to squeeze a whole lot of culture in, Shakespeare, Star Wars and Spongebob. I don't think that's ever been done before either. Well done, you go girl!!!!!
ReplyDeleteHow did I miss this?!?!? Got plans for this baby. *g* Thanks!!!
ReplyDeleteI love this block! I just had to make one of my own and I think its inspired a new wall hanging for my bedroom. Love it! I blogged about it here:
ReplyDeletehttp://silverlilysews.blogspot.com/2011/03/wip-wednesday-and-other-things-that-are.html
oh this is perfect for the little pack of 3" squares of Innocent Crush I have in my stash and I can learn about HSTs too.
ReplyDeleteI love this block !!!
ReplyDeleteI am soooo bad at following directions. Joanna and I used charm squares, so our finished blocks are GIGANTIC, which is actually very cool because one block is a wall hanging, and four blocks would be a nifty lap quilt.
ReplyDeleteI love this block, thanks for giving the instructions. Yours looks wonderful!
ReplyDeleteLove this, but what is the finished size of the block?
ReplyDeleteCourt, the finished block here is 12" although you can of course scale it up or down by using larger or smaller squares and HSTs.
ReplyDeleteLove this block! I am going to try it. Thanks for great directions.
ReplyDeleteGinny
(BrooklynQuilter.blogspot.com)
I absolutely love this block! If you don't mind, I'm going to direct my group in do.Good Stitches over here to do this block for our charity quilt next month. :)
ReplyDeleteThanks for the good tutorial! It was fun to make. http://piecinglight.wordpress.com/2011/11/29/antipodean-christmas-piecing/
ReplyDeleteThis is a very lovely block-Thanks for sharing your tutorial. It makes up into one gorgeous quilt.
ReplyDeleteRegards,
Anna